Cross Stitch Patterns from Fine Art by Scarlet Quince
 Cart 
 Wish list
     |     
     |     
Check out
     |     
     |     
Wholesale log in
Member services
Scarlet Quince
Goodies
Ramblings

Scarlet Quince Ramblings

Cross stitch ... art ... life

September 14th, 2011

When I first realized there were fires all around us, I started making a list of things to take if we needed to evacuate and gathering things up. Now that the panic is over (not that we were really ever in danger) I’ve been thinking more about the whole subject of being prepared to evacuate, what to take, what things I wouldn’t want to lose, and if we did lose most everything, what would we actually replace?

It’s hard to be rational about all this. One person I talked to said that she hated to leave her house because then she would not be able to protect it. Fire is apparently the monster under the bed of my mind — when we return from a trip I always half expect to find the house burned down. From what, I don’t know — not wildfires, since these were such a shock. Tornadoes are much more likely here and yet I don’t worry much about them, nor have I ever considering making an evacuation kit or even list in the event of a tornado. We don’t have a basement and in the event of a tornado you’re supposed to go into a bathroom, preferably one with no windows, and hang onto the pipes (picture me lying on the floor in the bathroom clinging to the pipes under the sink as the house blows away over me). The most worrying I have ever done about that scenario is to wonder how we would get all three cats into that bathroom, particularly the one who won’t allow us to pick her up.

Here are the conclusions I’ve come to mulling all this over.

I should make a detailed, prioritized list of the things we would want to gather up if we needed to get out. To the extent possible, the things on the list should be already gathered/packed and ready to go. (Picture albums, which we rarely look at, could be packed — art on the walls could not, unless we want to let a possible disaster run our lives.) I found a good sample list and thoughts on an emergency plan here. One thing I would grab for sure would be the computer (just the box, not the peripherals) and lots of the things on that list are on the computer. Or in the safe deposit box — but I hadn’t thought of taking the key!

For me, the main things to save would be the cats, photo albums (and I’ve been scanning those and putting them online), needlework (finished and un), art, some jewelry and heirlooms, the computer. My grandmother was a big collector of glass and crystal, and I have some of her things. I would hate to lose them but it’s hardly the kind of thing you can take if you’re fleeing for your life.

Which led me to the thought: there’s so much STUFF around here. The vast majority of it is never used and I wish there were a lot less of it. Admittedly, it’s much easier for me to identify things belonging to MRA that should go away (it’s my stuff but his junk) and he probably feels the same way about my things. In some cases I can see it: there’s a needleboard for pressing velvet without crushing it which I used for making a velvet jacket, what, 30 years ago? Am I really ever going to make anything out of velvet again? I know some people say “If you haven’t used it in a year, get rid of it.” But there ARE things that we actually do use only once every few years, but that would be expensive to replace, like the sleeping bags. Do we really need an entire wall of computer science books that are rarely referred to? Clearly not, but then those belong to MRA.

One of the things I have put off doing, over and over, is a household inventory. You’re supposed to do that, right? So I bought one of those little books where you can go room to room and write down all the things in that room. Would you like my little book? It’s in new condition. But it would not be that much work to take digital photos of everything, mess and all, and burn a CD or two. (Once, MANY years ago, MRA spent a day getting things out, taking pictures, putting them away, and finally he began to wonder why the roll of film in the camera wasn’t used up. Then he discovered that there WAS no film in the camera. Bless his heart, he put film in and did it all again. We still have those pictures in the safe deposit box, but many of the things IN the pictures are gone. I wouldn’t go to that much trouble — just point the camera into closets and cupboards.) But in reality, although it’s hard to make up my mind that I NO LONGER NEED any given item, there are lots of things that I certainly wouldn’t replace if they were gone, and that’s an easier way to think about it. So I should still take the pictures for insurance purposes, but maybe I can start slowly getting rid of things I wouldn’t replace. If it makes me happy to own something that falls into that category, for some reason, I don’t have to get rid of it (yet) — there are plenty of things I’m not especially attached to. Baby steps!


September 7th, 2011

Hurricanes, floods, hail … now fire!

All the yellow, orange, and green spots are various fires, and the quince flower is where we are. We got a lot of wind but no rain with Hurricane Lee, which made landfall in Louisiana and went east. The fires were made much worse by all the wind, and the fact that it basically hasn’t rained here in a year. I completely freaked out when I found out about them and was getting all set to evacuate. Once I realized that they were not actually heading toward us, I calmed down. It has been amazingly difficult to get information (or accurate information). The Weather Underground web site, for example, has staunchly insisted that we were having winds of 1 mile per hour even as the fire reports said the winds were 25-35 mph. Fortunately, the wind is gone, so I hope they will start to be able to contain these fires.

The large fire to the east of us started in the Lost Pines, which is a stand of loblolly pines which are the remnants of pine forest which covered much of Texas during the Ice Age. All but 100 of 6000 acres have burned. I suppose there have been wildfires there before so I hope it will come back. Here’s a video of how fast the fire spread.


August 5th, 2011

This is miscellaneous followups to the last two posts.

I’ve moved the color swatches on the labels to the bottom (under the numbers). I think this makes more sense for filing, since it puts the numbers at the tippy-top of the folded label. It seems to me that the colors grab the eye no matter where they are, but what can you do.

I heard from someone who uses the giftwrap tape to keep her labels attached that it sticks better to plastic bobbins than the regular tape, and that’s the reason she uses it.

I tried another approach to helping the labels stick: I scuffed up both sides of the top of a plastic bobbin with a nail file. I didn’t expect this to help because one side is already textured, and the other is smooth, and the current labels didn’t stick well to either. But when I tried to remove the label I put on the scuffed-up bobbin a week or two ago, I had the devil of a time getting it off. None of my labels stick that well to unscuffed bobbins! If I was going to try this on a larger scale, I would use a piece of steel wool (moderately fine grit — the kind for sanding, not the kind for dishes — and make sure it was leaving visible scratches) and do both sides at a time. I’d then rinse the bobbins in water to get all the dust off (and dry them, of course) before attaching labels.

However, I am hoping that none of this will be necessary with the labels with the “more aggressive” adhesive. I still haven’t received the samples I requested and was running out of time to order new labels, so I just took a leap of faith and ordered a batch of that kind. That was yesterday, so my samples will probably come today. Keep your fingers crossed for sticking power!

There’s still a lot of work to do before the color labels will be available, but we’ll try to get them out soon.

Update: the samples did come today, and they are much stickier. Will they stay permanently stuck to plastic bobbins? Time will tell, but they will definitely stay stuck longer than the current labels.


July 29th, 2011

If you use plastic bobbins, you have a problem with the floss labels coming unstuck. They stick at first, but then one side or the other starts to lift. My bobbins have a slightly textured side, while the other side is smooth. The labels don’t seem to adhere reliably to either side. We switched to different labels at one point in the hopes of solving this problem, but while the new labels seem to stick a little better, they still tend to lift.

I called my label supplier today and explained the problem and asked what they would recommend. They explained that sticking to plastic is tricky because plastic, being a petroleum product, emits vapors which acts against the adhesive. They do have a type of label I haven’t tried yet, which I’m told has their “most aggressive adhesive”. I’ve requested samples and I really hope this solves the problem. (I still have a lot of cardboard bobbins, but I bought 1000 plastic bobbins from Nordic Needle and as I finish the floss on a cardboard bobbin, I’m replacing it with plastic.) My bobbins have a fairly large hole in the top, so I press the two sides of the label together at the hole, so it’s sticking to itself. This insures that the label won’t hop right off the bobbin, but the corners still lift, and pick up cat hair and what have you and that just makes the lifting problem worse.

One person told me she uses Scotch Giftwrap tape (in the purple dispenser) to attach her labels to plastic bobbins and she has no problem with them coming off. I was thinking that that was a double-sided tape, but it doesn’t seem to be, so now I’m not sure what the special advantage of that tape would be, unless it’s that it disappears better than standard tape. I don’t know if it’s stickier. But I hate to tell people they need to use tape on supposedly sticky labels, so I’m keeping my fingers crossed for “aggressive adhesive”.


July 20th, 2011

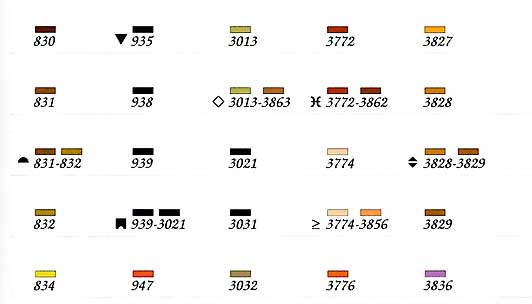
Here’s a preview of the floss labels with color swatches:

If you look carefully, you can see the label edges — the bottoms of the labels are just below the numbers. They’re laid out like the current labels, but just have color swatches above the numbers. These are about actual size (the labels are 1″ wide by 5/8″ high). The color is better than it appears — for example, 939 and 3021 are clearly different colors on the real labels.

There’s some work to do before we can make them available, but here’s what we’re thinking, and we’d like to know how you feel about the whole thing.

  1. It may not be necessary to have a color swatch for the solid colors, especially the ones that don’t have a symbol, but it seems like it can’t hurt.
  2. The color labels may cost slightly more than all black labels, but not much.
  3. We will discontinue all black labels. These seem like a huge improvement and having two kinds would be confusing. (I’d start using them this instant but the current label stock is not suitable for color printing — it smears.)
  4. We will have a coupon for some period of time to allow people (especially people who JUST bought all black labels) to get the color labels at a good discount.
  5. They may not be water-proof. (The current ones happen to be, although it has never come up, for me.)

None of this is set in stone (yet). What are your opinions, questions, concerns?


June 27th, 2011

So I was stitching last night, minding my own business, when it slowly soaked into my consciousness that the needle I was using to stitch the & symbol, which should have had a green and a gold thread, actually had two brown threads. (No, I don’t memorize the colors for each symbol but some I just learn after I’ve stitched them for a while.) I pulled out the last 3 or 4 stitches which were around the edges and then decided that would be a good time to quit for the night. I’m not actually sure of the extent of the damage — there are at least a few more wrong stitches, and to get at them I will have to rip out all the surrounding stitches. I’m going to look at it and maybe decide that it’s not worth bothering with. Although the thread is the wrong color, it is similar in darkness. It’s in a very confettic area but there is a pattern although you have to step back to see it.

I’m not sure how this happened. I may have parked a needle in the wrong place, although I think I’m really pretty careful about that. Much more often, I think, I just put floss back onto the wrong bobbin. I don’t know how I do that. I think maybe I look at the right bobbin and then pick up a different one. That sounds odd but I’ve caught myself doing it. Then later I notice I have 4 colors of floss on one bobbin, or I pick a bobbin up and realize that the color on it is clearly wrong (like a light color with a dark symbol, or vice versa). Sometimes I can figure out what the symbol for the floss should have been and sometimes I just have to throw the floss away because I don’t know what it is.

Earlier today, I thought, “I should snip half an inch of the two colors of floss on each bobbin and tape it to the bobbin.” That would be a way to check whether I was putting floss on the right bobbin. And even if I still put it on the wrong bobbin, I would probably notice when I went to use it again. My next thought was that that sounds like kind of a chore, so now I’m thinking about printing floss labels with the colors. The numbers and symbols would still be black, but there would be two little swatches or lines of the appropriate colors added to the labels. This wouldn’t necessarily let you know which thread on a bobbin was which, if it was ecru and sand for example, but it might keep you from putting blues on a bobbin that was supposed to have pinks.

What do you think?


June 19th, 2011

Because of the Canada Post strike, starting today the US Postal Service is not accepting mail addressed to Canada. If you are in Canada and wish to order from us while the strike continues, please email or call to discuss alternate arrangements. See the contacts page for email addresses and phone numbers.


June 8th, 2011

A stitcher wrote asking how she could share her stitching tips. I said she could post them in the forums, or send them to me and I’d put them online. This seems like a good place for them until I can merge them into the tips pages. (If YOU have tips you’d like to share, please send them! Everyone has their own little tricks, and yours may be just what someone needs.) Here are her notes:

Although “self-taught”, I have been an avid cross stitcher for 40+ years after seeing waste-canvas monograms used by a friend of my mother’s when I was in high school. Over the years, I discovered several tips that make stitching easier.

1. Rather than use the pre-lined fabric I saw referenced in the blog, I use an extra-fine, water-soluble pen to draw a line on every 10th grid to match the graph I am using. If the center of the graph is or is not on the 10th grid, I make my fabric match the pattern. Then, when stitching I know exactly where I am on both the fabric and the graph. If the centerlines are not on a line already marked, I also mark these lines as well, but with broken lines and arrows so they stand out. Unfortunately, I have only found these pens in the same color of blue, so I do not have the option of using another color. These lines stay sharp until time to wash the fabric, but if a marking mistake is made, a damp Q-tip erases the mark, but let it dry completely before remarking or the blue color will run. Another version of the pen is available in purple, but it is not quite as fine of a tip and disappears after a short period of time and is good only on areas I stitch immediately. Both pens are found in sewing or quilting notions and are well worth the expense and time to draw out the lines!! I have never had any problems getting the lines to disappear with water!

2. When traveling, I always take along a cross-stitch project, I try to select an area in my design where there will be some “fill-in” work and draw this area with the same water-soluble pen. Then I do not need to count, but can simply fill in the drawn area with the correct color. Years ago I was stitching a design based on a Jim Harrison painting and I was able to mark several areas in this manner and also write into the area the correct color to use. Stitching in the car was easy and (almost) fool proof! Of course, detailed designs like the gorgeous Scarlet Quince designs do not lend themselves to large fill-in areas, but I wanted to share the tip anyway.

3. The pens work well to draw letters on the fabric as well.

4. I do a lot of original designs based on photographs or combined graphs using graph paper with the same bolded lines based on 10 squares per inch as most designs are drawn. This allows me to carefully mark the graph paper to see how the design will look when stitched. Just remember to allow for the difference in the stitches per inch vs. the number of grids per inch on the paper or your design will be considerably smaller than the drawing!!!

I hope these ideas are helpful to some other stitchers!!!

Me again. The water-soluble marking pens usually say that they are water soluble. The (usually but not always) purple pens where the ink disappears on its own either say “disappearing ink” or “air erasable”. If you have a fabric marker and you’re not sure about it, please test it before you do a lot of work gridding. I hate to think of anyone doing a lot of work gridding only to find that the lines had disappeared 24 hours later (or wouldn’t wash out)!


May 7th, 2011

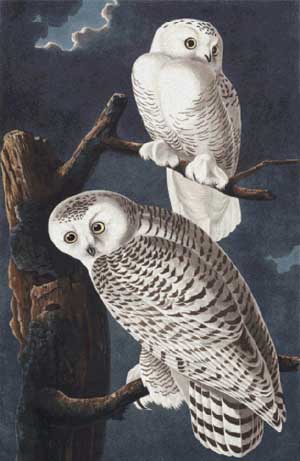
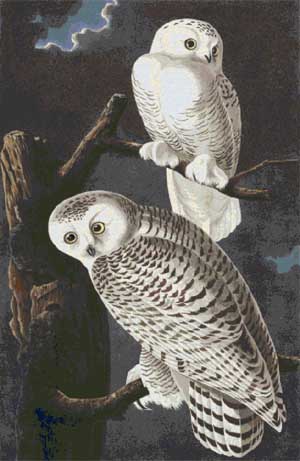
Many people tell us, “I like your patterns so much — now if they just didn’t use blended colors!” or “There are 450 DMC colors — why isn’t that enough for you?”

Here’s what happens if you replace the blends in a couple of our patterns with the closest solid colors. The pictures on the left are the actual patterns, with blended colors — the ones on the right are using solid colors only.

With blends
With solids only

With blends
With solids only

March 12th, 2011

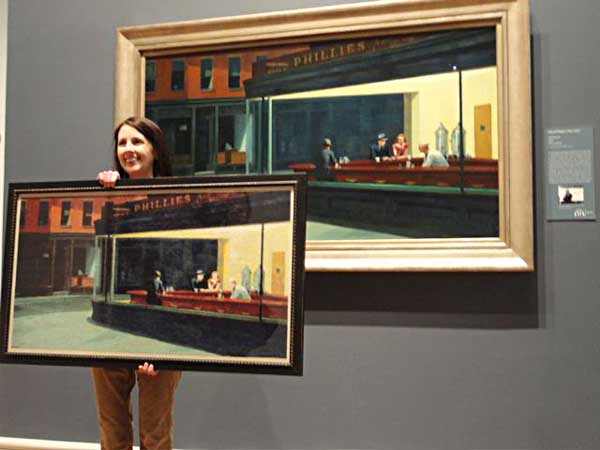
Barbara Miller finished stitching Nighthawks – Edward Hopper, took it to the Art Institute in Chicago to visit the original, and she made the Chicago Tribune!

Nighthawks

You can read the article here. Alas, they don’t mention Scarlet Quince, but you can’t have everything. The author of the article was clearly not too conversant with “the craft style known as counted cross stitch” so some important information was omitted: this was stitched on 32-count linen, using Q-Snaps, with hair clips to keep the extra fabric rolled up and out of the way.

It’s an amazing achievement and I feel both impressed and proud!


Privacy policy | Return policy | Site map | Member services | Contact us | Help
Copyright © 2002-2024 Scarlet Quince, LLC. All rights reserved.
You are welcome to link to this page but you may not use words or pictures on another site without written permission.